Saturday, March 5, 2016

Serendipity update

Oh my goodness, it is has been over 6 months since I have posted about my progress on my serendipity quilt. I started working on multiple blocks because I was having some creative indecision on selecting embellishing stitches and wool colors. I am not thrilled with some of my color decisions but truthfully, I just want to finish this quilt and move on to other projects. I now have 9 out of 12 blocks finished.
Serendipity 4 more blocks
As my serendipity blocks where up on my design wall, I decided to make some changes to the previously posted fish block. I added yellow wool under the angel fish eye to make the eye more defined. I also sewed eyes on the magenta fish and the clown fish.
Serendipity Fish block 2

Thursday, January 14, 2016

Black and White and Read All Over

I have a personal rule, I don't buy fabric without a plan to use the fabric in the immediate future. In other words, I don't want to buy fabric to add to my stash. In October, I went Modern Quilting just to check out the newest quilt store in Phoenix. I saw a newspaper fabric that I just loved but I really did not have any plan for using this fabric. I walked around the store but I kept going back to the newspaper fabric so I looked at books for a quilt idea. I found the book, Jelly Roll Jambalaya Quilts by Jean Ann Wright and I liked one quilt called Andouille. So with a quilt in mind, I purchased a jelly roll (a first for me) and enough newsprint fabric to use for the quilt back.

Newspaper quilt back
The fabric is modern background paper by zen chic for Moda. As I am sewing the quilt, I am remembering the old riddle - What is black and white and read all over? The answer is a newspaper because of the identical pronunciation of read and red. Wow, I now have a name for my new quilt, Black and White and Read All Over and an idea for the machine quilting. Jessica Jones Gamez did the beautiful machine quilting with red thread.
Black and White and Read All Over
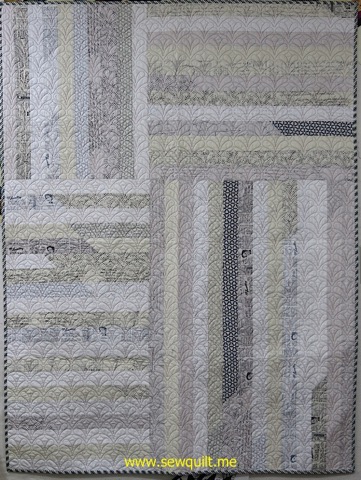
I used a striped fabric for the binding which I cut on the bias. The quilt is 62" by 47".

Sunday, January 10, 2016

Sunflower Cowboy boot

Yesterday, I finished another boot at Claudia Dinnell's "Boot"iful Bouquets class. I had so much fun and my Bernina 790 performed like a champ. My second boot was again a cowboy boot but I made a blue boot with grey trim, choosing brighter hues than I used on the first cowboy boot. The second boot has a sunflower bouquet instead of the Christmas toys.

I love the Maxi hoop which I can use on my Bernina 790 because of the large embroidery area. The entire boot was embroidered in one hooping and the sunflower bouquet only required one hooping too. The embroidery time for just the sunflower bouquet was 180 minutes. The background fabric is stabilized with Shape Flex SF101 by Pellon. Then a polymesh cutaway stabilizer was sprayed with Webbond by Mettler to adhere it to the back of the background fabric. After the background fabric was hooped, a piece of tear-away stabilizer was floated. Hooping is easier with the polymesh stabilizer since it is softer and more flexible than medium weight tear-away stabilizer. This stabilizing procedure was a new technique for me.
Sunflower Cowboy Boot

This week, I need to add borders to the finished embroidered centers. One of the best parts of these 2 quilts, all the fabric and threads were in my stash.

Friday, January 8, 2016

Christmas Cowboy Boot

What a fun day!  I took a machine embroidery class with Claudia Dinnell of Claudia's Creations.  Actually, it is a 2 day class so I get to have fun tomorrow too.  Claudia designed a new rework style design for machine embroidery call "Boot'iful Bouquets.   There are 3 boot types and 3 different bouquets to choose from, "Boot"iful Bouquets is  the ultimate pick and chose machine embroidery design. The boot types were a cowboy boot, an ice skate or a Victorian boot and the bouquets choices were toys, sunflower or instruments.  

Christmas Cowboy Boot block
I choose the cowboy boot and filled it with a christmas toy bouquet.  Currently, the block is about 15" by 20”. 

Tuesday, January 5, 2016

Bernina Stitch Designer

My Bernina 790 has a very cool feature called Stitch Designer. Today, I took a class at Bernina Connection where I was able to explore a few of the Stitch Designer features. The Stitch Designer allowed me to create stitches by drawing right on the machine touch screen.
Bernina stitch designer class
Today, I learned how to alter existing stitches by adding additional elements or move stitch points to create a new stitch. I was able to write my name on the touch screen and stitch it out. The circles were also drawn on the touch screen and by removing the 9 mm restraint, I was able to stitch the circles using the Sideways Motions foot. The larger circles design is almost 2 inches wide. I was able to alter stitch #1329, a blanket stitch, to have a slanted appearance which really could be a nice edge stitch on a ribbon edge.

Wednesday, December 23, 2015

Christmas gift exchange

I belong to Sew Sisters, a weekly stitching group. Although, I am unable to attend a lot of the meetings, I always enjoy the creative input and lively conversations when my schedule allows me to attend. This year, I decided to participate in the holiday gift exchange. I made a wool appliqué pin cushion which is about 4 1/2" square and filled with crush walnut shells.

Cactus pincushion
I am on a Bernina Yahoo group and a few months ago, the leader of the group posted information about a machine embroidery web site called Urban Threads. Urban Threads had some very unique and modern machine embroidery designs and I purchase 2 of their designs. One of the designs I purchased was Have a Holly Jolly Christmas which I used to make a gift bag for the cactus pincushion. The bag is 7 1/2" by 10".
Have a Holly Jolly Christmas bag

I hope everyone has a wonderful holiday season and a happy, healthy and prosperous new year.

Friday, December 18, 2015

Christmas stockings

I needed to make a few new stockings this year and all the Christmas stocking are now hanging. I actually finished the stocking over a week ago, but life got a bit hectic and I was unable to do a blog post. I made a set of stockings for my daughter's new condo plus I also needed to make a new stocking for Emmie, my daughter's new miniature poodle for my house.
Christmas stockings 2015
My stocking are made using Vogue pattern 1312 which came out in the early 1970's. In 2010, I used a Bernina 180 to embroidery the names on the stocking cuffs using a font installed on the machine. Luckily, Bernina kept the same font on my current machine, a Bernina 790. It is always a challenge to make sure the once the cuff in sewed on and turned down that the name is in the correct position and I must admit that I did sew one of the cuffs on incorrectly. Well that is why they make seam rippers.

I made the stocking for Marcie with Hoffman Christmas batiks which were retired in 2009 but I was able to find the batiks at my favorite on-line batik source, Batiks Plus.
Marcie and Emmie Stockings